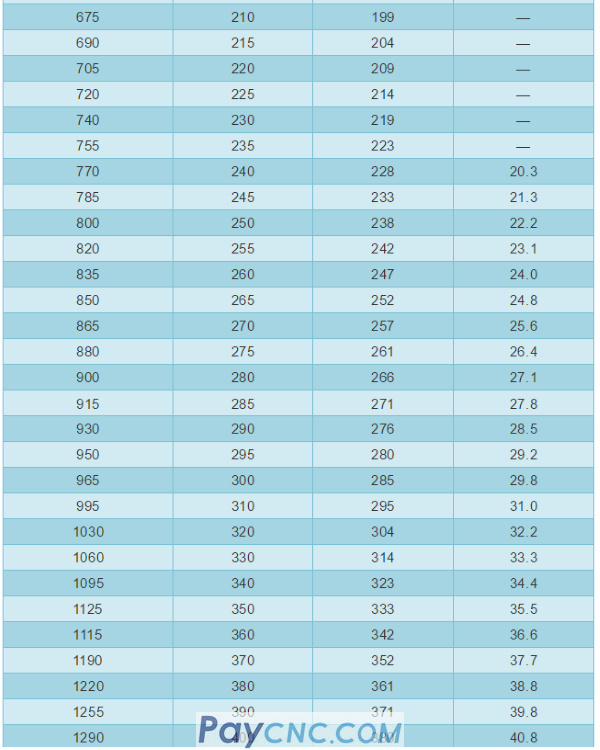
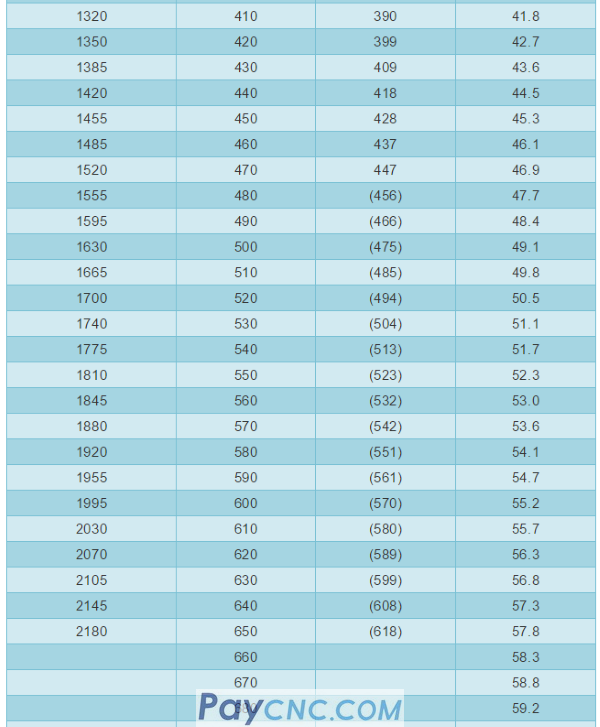
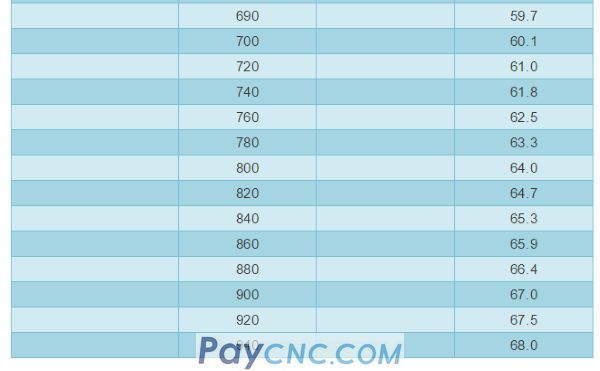
Hardness refers to the ability of a material to resist local deformation, especially plastic deformation, indentation or scratches. It is a measure of the hardness of the material. The comparison table of Vickers hardness, Brinell hardness, and Rockwell hardness is shared with you. Collect it now!
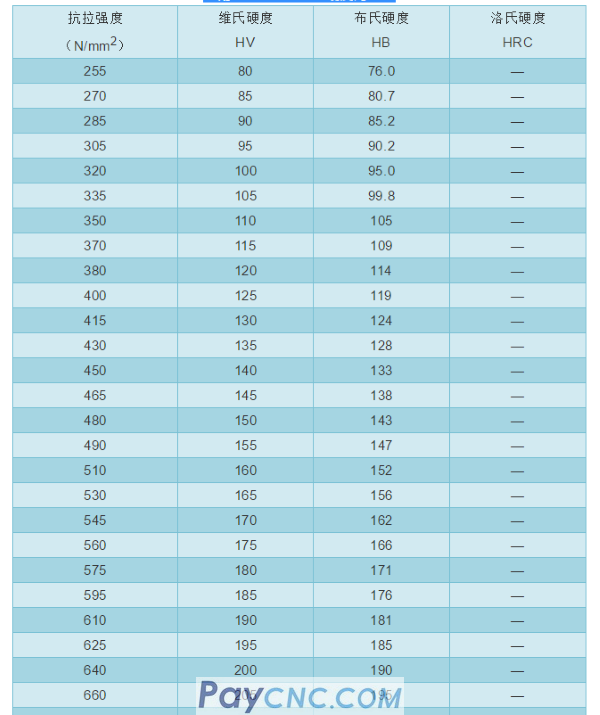
Commonly used HV=HB=HRC hardness comparison table
Hardness of metal materials
hardness
Refers to the ability of a material to resist local deformation, especially plastic deformation, indentation or scratches. It is a measure of the hardness of the material.
According to different test methods, hardness is divided into three types.
①Scratch hardness. It is mainly used to compare the softness and hardness of different minerals. The method is to select a rod with one end hard and one soft end, and the tested material is scratched along the rod, and the hardness of the tested material is determined according to the location of the scratch. Qualitatively speaking, hard objects have long scratches and soft objects have short scratches.
②Press-in hardness. Mainly used for metal materials. The method is to press the specified indenter into the tested material with a certain load, and compare the hardness of the tested material with the size of the local plastic deformation on the surface of the material. Due to the difference of indenter, load and load duration, there are many kinds of indentation hardness, mainly Brinell hardness, Rockwell hardness, Vickers hardness and micro hardness.
③Rebound hardness. It is mainly used for metal materials. The method is to make a special hammer fall freely from a certain height to impact the sample of the material to be tested, and how much strain energy is stored (and then released) by the sample during the impact process (through the return of the hammer) Jump height measurement) to determine the hardness of the material.
The most common Brinell hardness, Rockwell hardness and Vickers hardness of metal materials belong to the indentation hardness. The hardness value indicates the ability of the surface of the material to resist the plastic deformation caused by the intrusion of another object; the rebound method (Shore, Li The hardness is measured, and the hardness value represents the size of the elastic deformation function of the metal.
Brinell Hardness
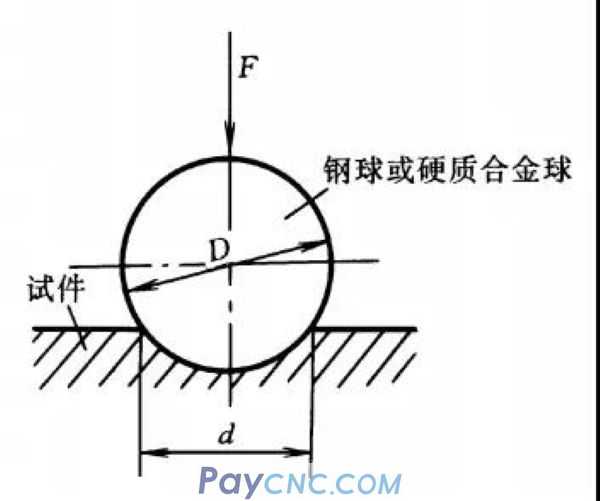
Use a quenched steel ball or a cemented carbide ball of diameter D as the indenter, press the corresponding test force F into the surface of the test piece, after the specified holding time, remove the test force to obtain an indentation of diameter d. Divide the test force by the surface area of the indentation, the value obtained is the Brinell hardness value, and the symbol is represented by HBS or HBW.
The difference between HBS and HBW is the indenter. HBS means that the indenter is a hardened steel ball, which is used to determine materials with a Brinell hardness value below 450, such as mild steel, gray cast iron and non-ferrous metals. HBW indicates that the indenter is a cemented carbide and is used to determine materials with a Brinell hardness value below 650.
The same test block, when other test conditions are completely the same, the two test results are different, the HBW value is often greater than the HBS value, and there is no quantitative rule to follow.
After 2003, my country has adopted international standards equivalently, abolished the steel ball indenter, and all adopted cemented carbide ball heads. Therefore, stop using HBS and add WeChat: Yuki7557 to send a copy of the macro program tutorial. All use HBW to represent the Brinell hardness symbol. In many cases, Brinell hardness is only expressed by HB, which means HBW. However, HBS is still seen in literature papers.
The Brinell hardness measurement method is suitable for cast iron, non-ferrous alloys, various annealed and quenched and tempered steels. It is not suitable to measure samples or workpieces that are too hard, too small, too thin, and whose surface is not allowed to have large indentations.
Rockwell Hardness Rockwell Hardness
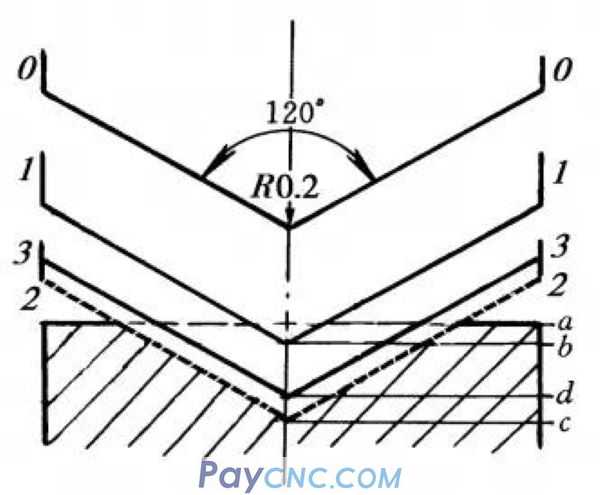
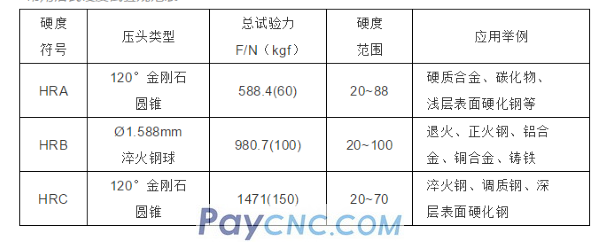
Use diamond cones with a cone angle of 120° or Ø1.588mm and Ø3.176mm quenched steel balls as the indenter and load. The initial load is 10kgf and the total load of 60, 100 or 150kgf (that is, the initial load plus the main load) The specimens are pressed in successively, and after the total load is applied, the hardness is expressed by the difference between the indentation depth when the main load is removed and the main load is retained and the indentation depth under the initial load.
The Rockwell hardness test uses three test forces and three indenters. There are 9 combinations of them, corresponding to 9 scales of Rockwell hardness. The application of these 9 rulers covers almost all commonly used metal materials. There are three commonly used HRA, HRB and HRC, of which HRC is the most widely used.
The applicable range of HRC scale is 20~70HRC. When the hardness value is less than 20HRC, because the conical part of the indenter is pressed too much and the sensitivity is reduced, then the HRB scale should be used; when the hardness of the sample is greater than 67HRC, the pressure on the tip of the indenter is too large and the diamond is easily damaged. The life of the indenter will be greatly shortened, so the HRA scale should generally be used instead.
Rockwell hardness test is simple, fast and small indentation. It can test the surface of finished products and harder and thinner workpieces. Due to the small indentation, for materials with uneven structure and hardness, the hardness value fluctuates greatly, and the accuracy is not as high as the Brinell hardness. Rockwell hardness is used to determine the hardness of steel, non-ferrous metals, cemented carbide, etc.
Vickers Hardness
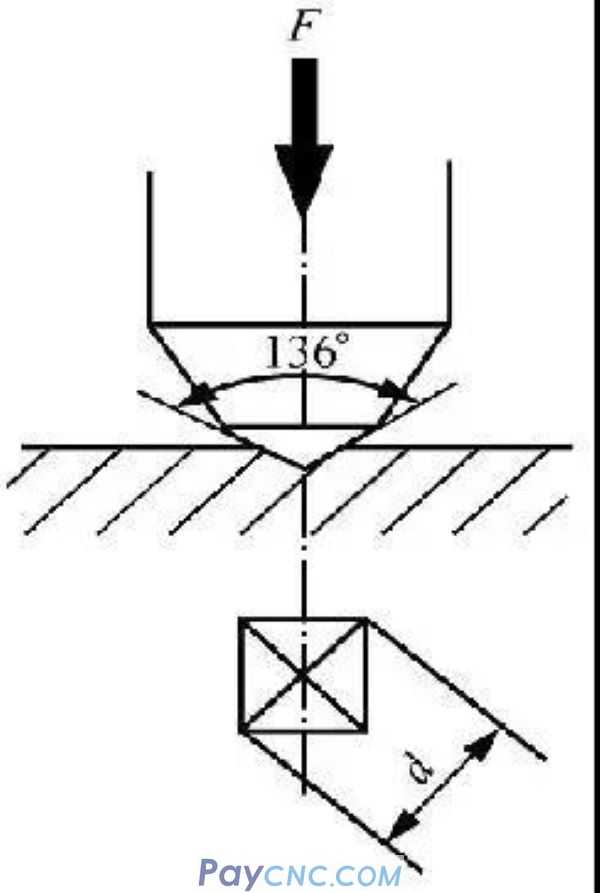
The principle of Vickers hardness measurement is similar to that of Brinell hardness. Adopt a diamond square pyramid indenter with an angle of 136° relative to the surface, press it into the surface of the material with a specified test force F, and then remove the test force after holding it for a specified period of time. Use the average pressure on the square pyramid indentation per unit surface area to indicate the hardness Value, the symbol is HV.
Vickers hardness measurement range is large, and it can measure materials with hardness in the range of 10~1000HV, with small indentation. It is generally used to measure thinner materials and surface hardening layers such as carburizing and nitriding.
Leeb Hardness
A certain quality of impact body equipped with tungsten carbide ball head is used to impact the surface of the specimen under a certain force, and then rebound. Due to the different hardness of the material, the rebound speed after impact is also different. A permanent magnet material is installed on the impact device. When the impact body moves up and down, its peripheral coil induces an electromagnetic signal proportional to the speed, which is converted into a Leeb hardness value through an electronic circuit. The symbol is marked HL.
The Leeb hardness tester does not require a workbench. Its hardness sensor is as small as a pen and can be directly operated by hand. It can easily detect large and heavy workpieces or workpieces with complex geometric dimensions.
Another advantage of Leeb hardness is that it has very light damage to the surface of the product, and sometimes it can be used as a non-destructive test; it is unique in hardness testing in all directions, narrow spaces and special parts.
|
 |
| Products Catalogue | Home | About Us | Retrofit | Download | News | Tech Support | Contact Us | |
|
|
|
