The vernier caliper is a commonly used instrument for measuring length in the industry. It can be directly used to measure workpieces with higher accuracy, such as the length, inner diameter, outer diameter and depth of the workpiece.
Overview of vernier calipers
As a widely used high-precision measuring tool, the vernier caliper is composed of a main ruler and a sliding vernier attached to the main ruler. If it is divided according to the scale value of the vernier, the vernier caliper is divided into three types: 0.1, 0.05, 0.02mm.
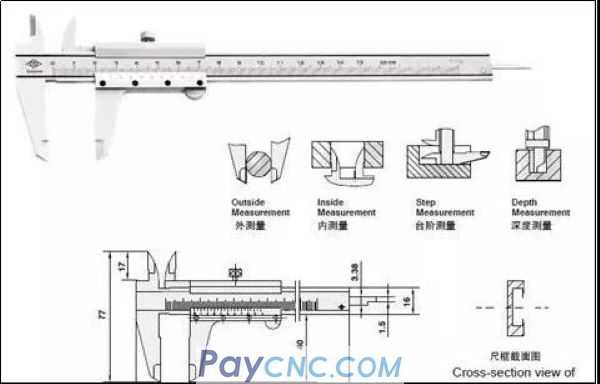
Vernier caliper reading method
Take the precision vernier caliper with a scale value of 0.02mm as an example, the reading method can be divided into three steps;
1) Read the number of whole millimeters according to the nearest scale on the main ruler to the left of the zero line of the sub ruler;
2) According to the zero line of the sub-ruler, multiply the number of engraved lines on the right aligned with the scale on the main ruler by 0.02 to read the decimal;
3) Add up the integer and decimal parts above to get the total size.
The reading method of 0.02mm vernier caliper

As shown in the figure above, the scale of the sub-ruler 0 line in front of the main ruler is 64mm, and the 9th line after the sub-ruler 0 line is aligned with one of the engraved lines of the main ruler.
The 9th line after the sub-ruler 0 line indicates: 0.02x9= 0.18mm
So the size of the tested workpiece is: 64+0.18=64.18mm
How to use vernier calipers
Put the measuring claws together and check whether the cursor is aligned with the zero mark of the main ruler body. If it is aligned, it can be measured: if it is not aligned, the zero error should be recorded: the zero scale line of the vernier is called positive zero error on the right side of the zero scale line on the ruler body, and the negative zero error on the left side of the zero scale line on the ruler body This regulation method is consistent with the number axis regulation, the origin is positive on the right, and the origin is negative on the left).
When measuring, hold the ruler with your right hand, move the vernier with your thumb, and hold the object with the outer diameter (or inner diameter) to be measured in your left hand, so that the object to be measured is located between the outer measuring claws. Reading, as shown in the figure below:
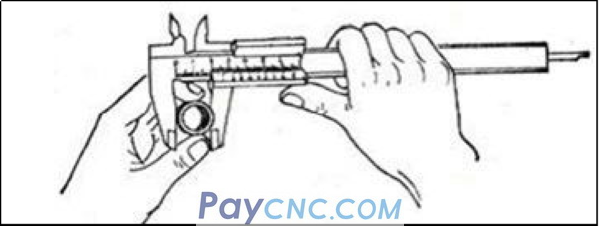
Application of vernier caliper
As a common measuring tool, the vernier caliper can be used in the following four areas: 1) Measuring the width of the workpiece
2) Measure the outer diameter of the workpiece
3) Measure the inner diameter of the workpiece
4) Measure the depth of the workpiece
Please see the figure below for the specific measurement methods of these four aspects:
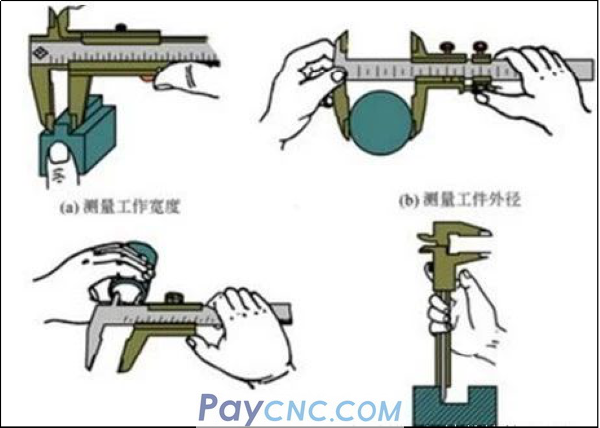
Precautions for use
The vernier caliper is a relatively precise measuring tool, so please pay attention to the following items when using it:
1. Before use, clean the measuring surface of the two clamp feet, close the two clamp feet, and check whether the 0 line of the secondary ruler is aligned with the 0 line of the main ruler. If not, the measurement reading should be corrected according to the original error.
2. When measuring the workpiece, the measuring surface of the clamp foot must be parallel or perpendicular to the surface of the workpiece, and must not be skewed. And the force can not be too large, so as to avoid the deformation or wear of the stuck feet, which will affect the measurement accuracy. 3. When reading, the line of sight should be perpendicular to the ruler surface, otherwise the measured value will be inaccurate.
4. When measuring the inner diameter size, it should be gently swayed to find the maximum value.
5. After the vernier caliper is used up, clean it carefully, smear it with protective oil, and place it flat in the closure. To prevent rust or bending.
The spiral micrometer is also called a micrometer, which is a kind of precise measuring tool. The principle, structure and usage method of the spiral micrometer will be explained below.
What is a spiral micrometer?
The spiral micrometer, also known as micrometer, spiral micrometer, and sub-centimeter, is a more precise tool for measuring length than vernier calipers. The length can be measured accurately to 0.01mm with a measuring range of several centimeters.
The structure of the spiral micrometer
The following is a schematic diagram of the structure of the spiral micrometer:
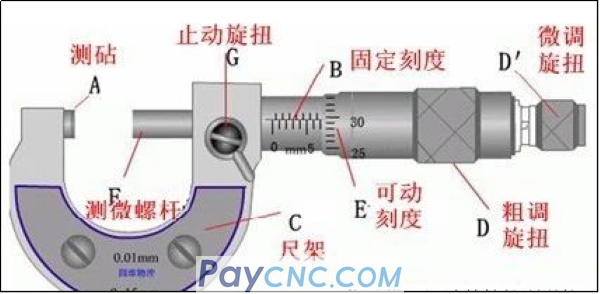
Working principle of spiral micrometer
The spiral micrometer is made according to the principle of spiral amplification, that is, when the screw rotates one circle in the nut, the screw advances or retreats along the axis of rotation for a distance of one pitch. Therefore, the tiny distance moved along the axis can be expressed by readings on the circumference.
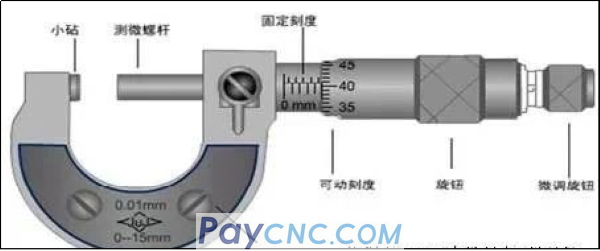
The screw pitch of the precision thread of the screw micrometer is 0.5mm, and the movable scale has 50 equal scales. The movable scale rotates once, and the micrometer screw can advance or retreat 0.5mm. Therefore, rotating each small division is equivalent to measuring The micro screw advances or retreats 0.5/50=0.01mm. It can be seen that each small division of the movable scale represents 0.01mm, so the screw micrometer can be accurate to 0.01mm. It is also called a micrometer because it can be estimated to read one digit, and the millimeter can be read.
How to use spiral micrometer
When we often help customers connect our data acquisition instrument with a spiral micrometer for high-efficiency measurement, we often instruct customers to do the following when making a spiral micrometer:
1. Check the zero point before use: Slowly turn the fine-tuning knob D′ to make the measuring rod (F) and the measuring anvil (A) contact until the ratchet makes a sound. At this time, the zero on the movable ruler (moving sleeve) The marking line should be aligned with the reference line (long horizontal line) on the fixed sleeve, otherwise there will be zero error.
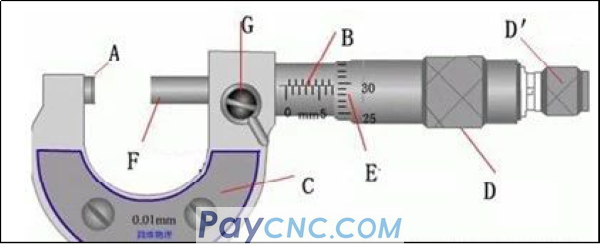
2. Hold the ruler holder (C) in the left hand, turn the coarse adjustment knob D with the right hand to make the distance between the measuring rod F and the measuring anvil A slightly larger than the measured object, put in the measured object, and turn the protection knob D′ to clamp the measured object until Until the ratchet makes a sound, turn the fixed knob G to fix the measuring rod and read.
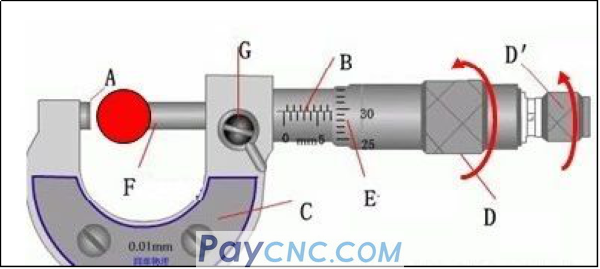
Spiral micrometer reading method
1. Read the fixed scale first
2. Read the half scale again, if the half scale line is exposed, record it as 0.5mm; if the half scale line is not exposed, record it as 0.0mm;
3. Read the movable scale again (pay attention to the estimate) and record it as n×0.01mm;
4. The final reading result is fixed scale + half scale + movable scale
Because the reading result of the spiral micrometer is accurate to the millimeter in mm, the spiral micrometer is also called a micrometer.
Precautions for spiral micrometer
1. When measuring, pay attention to stop using the knob when the micrometer screw is approaching the object to be measured, and use the fine-tuning knob instead to avoid excessive pressure, which can make the measurement result accurate and protect the spiral micrometer.
2. When reading, pay attention to whether the half-millimeter engraved line on the fixed scale has been exposed.
3. When reading, there is an estimated number in the thousandth place, which cannot be thrown away casually. Even if the zero point of the fixed scale is exactly aligned with a certain scale line of the movable scale, the thousandth place should be read as "0".
4. When the small anvil and the micrometer screw are close together, the zero point of the movable scale does not coincide with the zero point of the fixed scale, and there will be a zero error, which should be corrected, that is, remove the zero error value from the final length measurement reading.
Correct use and maintenance of spiral micrometer
• Check whether the zero line is accurate;
• Wipe clean the surface of the workpiece when measuring;
• When the workpiece is large, it should be measured on a V-shaped iron or flat plate;
• Wipe the measuring rod and anvil before measurement;
• A ratchet device is required when screwing the movable sleeve;
• Do not loosen the back cover to avoid changing the zero line;
• Do not add ordinary engine oil between the fixed sleeve and the movable sleeve;
• After use, wipe off the oil, put it in a special box, and store it in a dry place.
|
 |
| Products Catalogue | Home | About Us | Retrofit | Download | News | Tech Support | Contact Us | |
|
|
|
